Stuck in reverse (Laser scanner)
Well, I am getting a bit of progress on the 3D viewer and physics stuff but, it is rather slow. Part of the things that I wanted to try is to reverse engineer a real object and load it in a simulated Wind Tunnel (Physics engine) to run a basic test on that. This has lead me to create a very basic laser scanner at home. It’s very primitive at this point of time and I do not intend to go deep into developing the one giving best results, its too early.
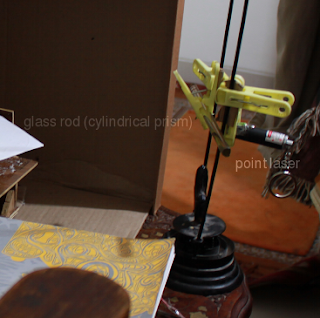
Above is the optical setup for the laser and camera. It’s far from being state of the art!
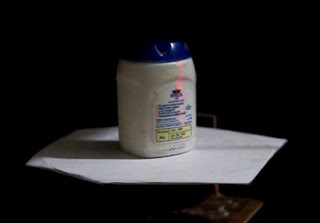
Above is the turn table on which the object would rest and will rotate using a slow motor.
The Math has also gone slightly out of hand there the object placement is a bit inaccurate and positioning of the camera with respect to the laser is known to be within a certain tolerance ;-) I need to get back to the basics and work out that part again but, it gives some sort of results as of now although not very accurate ones. It resembles the object being scanned… Yay!
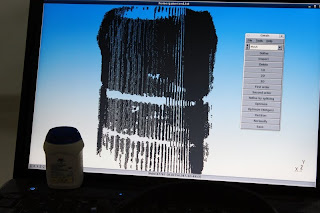
Above, is the object being scanned and the points which are computed and then plotted in a viewer.
For generating the points here are the steps I have followed, ideally a single program should do those things automatically…
- Capture a video by a fast camera
- Take screenshots through program like SMPlayer
- Calculate angular displacement of the model and use the equations mentioned in the reference articles
The image processing component is written by me, but the viewer is not able to handle so much data at the moment, hence, an open source tool GMsh is used for point visualisation.
References:
http://en.wikipedia.org/wiki/3D_scanner
http://www.youtube.com/watch?v=SPywgDBjM1Y
http://www.muellerr.ch/engineering/laserscanner/tutorial/the_principle.html

More posts